

Growing cannabis successfully requires understanding the fundamental principles of plant biology, environmental control, and cultivation techniques that have been refined over decades of research and practical experience. This comprehensive cannabis plant care guide provides everything you need to know about nurturing cannabis plants from seed to harvest, whether you’re among the first time growers or looking to improve your existing skills.
Cannabis cultivation has evolved significantly in recent years, with advances in lighting technology, growing mediums, and nutrient formulations making it easier than ever to achieve professional-quality results. However, success still depends on understanding the basic needs of cannabis plants and providing consistent care throughout their lifecycle. This guide covers every aspect of cannabis plant care, from selecting the right genetics to harvesting and curing your final product.
The key to successful cannabis cultivation lies in creating optimal environmental conditions while avoiding common mistakes that can reduce yields or compromise plant health. Cannabis plants are remarkably resilient when their basic needs are met, but they can quickly develop problems when stressed by poor environmental conditions, inadequate nutrition, or improper care techniques.
Understanding Cannabis Plants and Their Growth Requirements
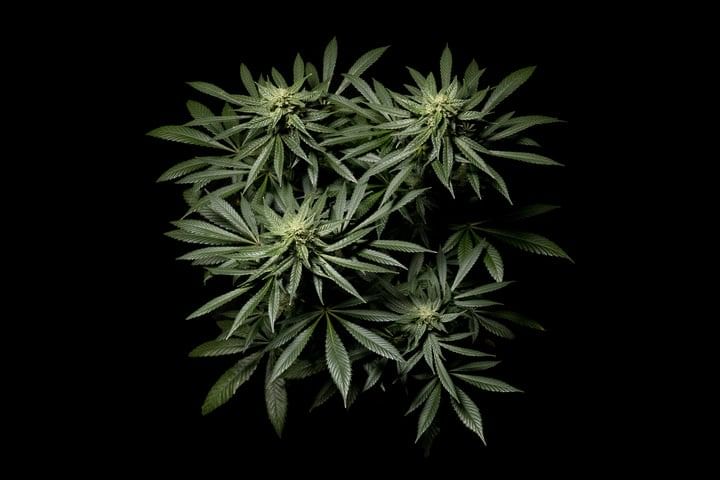
Cannabis plants belong to the Cannabaceae family and are annual flowering plants that complete their entire lifecycle within a single growing season. Understanding the basic biology of cannabis plants is essential for providing proper care and achieving healthy growth throughout all stages of development. Cannabis plants are dioecious, meaning they produce separate male and female plants, with female plants being the primary focus for most growers due to their production of cannabinoid-rich flowers.
The cannabis plant has evolved to thrive in diverse climates around the world, developing distinct characteristics that influence their growing requirements. Cannabis sativa varieties originated in equatorial regions and typically grow tall with narrow leaves, requiring longer flowering periods and more intense light. Cannabis indica varieties developed in mountainous regions with shorter growing seasons, resulting in compact, bushy plants that flower more quickly and are often easier to manage in indoor growing environments. Growing outdoors allows nature to provide the right amount of daylight and seasonal changes, requiring minimal intervention beyond watering and organic fertilization.
Modern cannabis cultivation focuses primarily on female plants, which produce the resinous flowers valued for their cannabinoid and terpene content. Male plants are typically removed from growing areas unless being used for breeding purposes, as they produce pollen that can fertilize female plants and reduce the quality of the final harvest. Understanding how to identify male and female plants early in their development is crucial for maintaining a productive growing environment.
Cannabis plants require specific environmental conditions to achieve optimal growth and development. Temperature, humidity, lighting, air circulation, and nutrition all play critical roles in plant health and final yield quality. The growing medium, whether soil, hydroponic systems, or soilless mixes, must provide adequate drainage while retaining sufficient moisture and nutrients for healthy root development. Coco coir is a high-quality soilless option that supports healthy roots and nutrient absorption, while hydroponic setups offer an alternative to soil for optimizing nutrient uptake and root health.
The lifecycle of cannabis plants consists of several distinct stages, each with unique requirements for lighting, nutrition, and environmental conditions. Understanding these stages and their specific needs allows growers to optimize their care techniques and avoid common problems that can impact plant health and final yields.
Cannabis Plant Stages: Complete Week-by-Week Development Guide
Cannabis plants progress through several distinct growth stages, each requiring specific care techniques and environmental conditions to ensure healthy development and maximum yields. Understanding these stages and their timing helps growers provide appropriate care and avoid common mistakes that can impact plant health.
Germination Stage (Days 1-7)
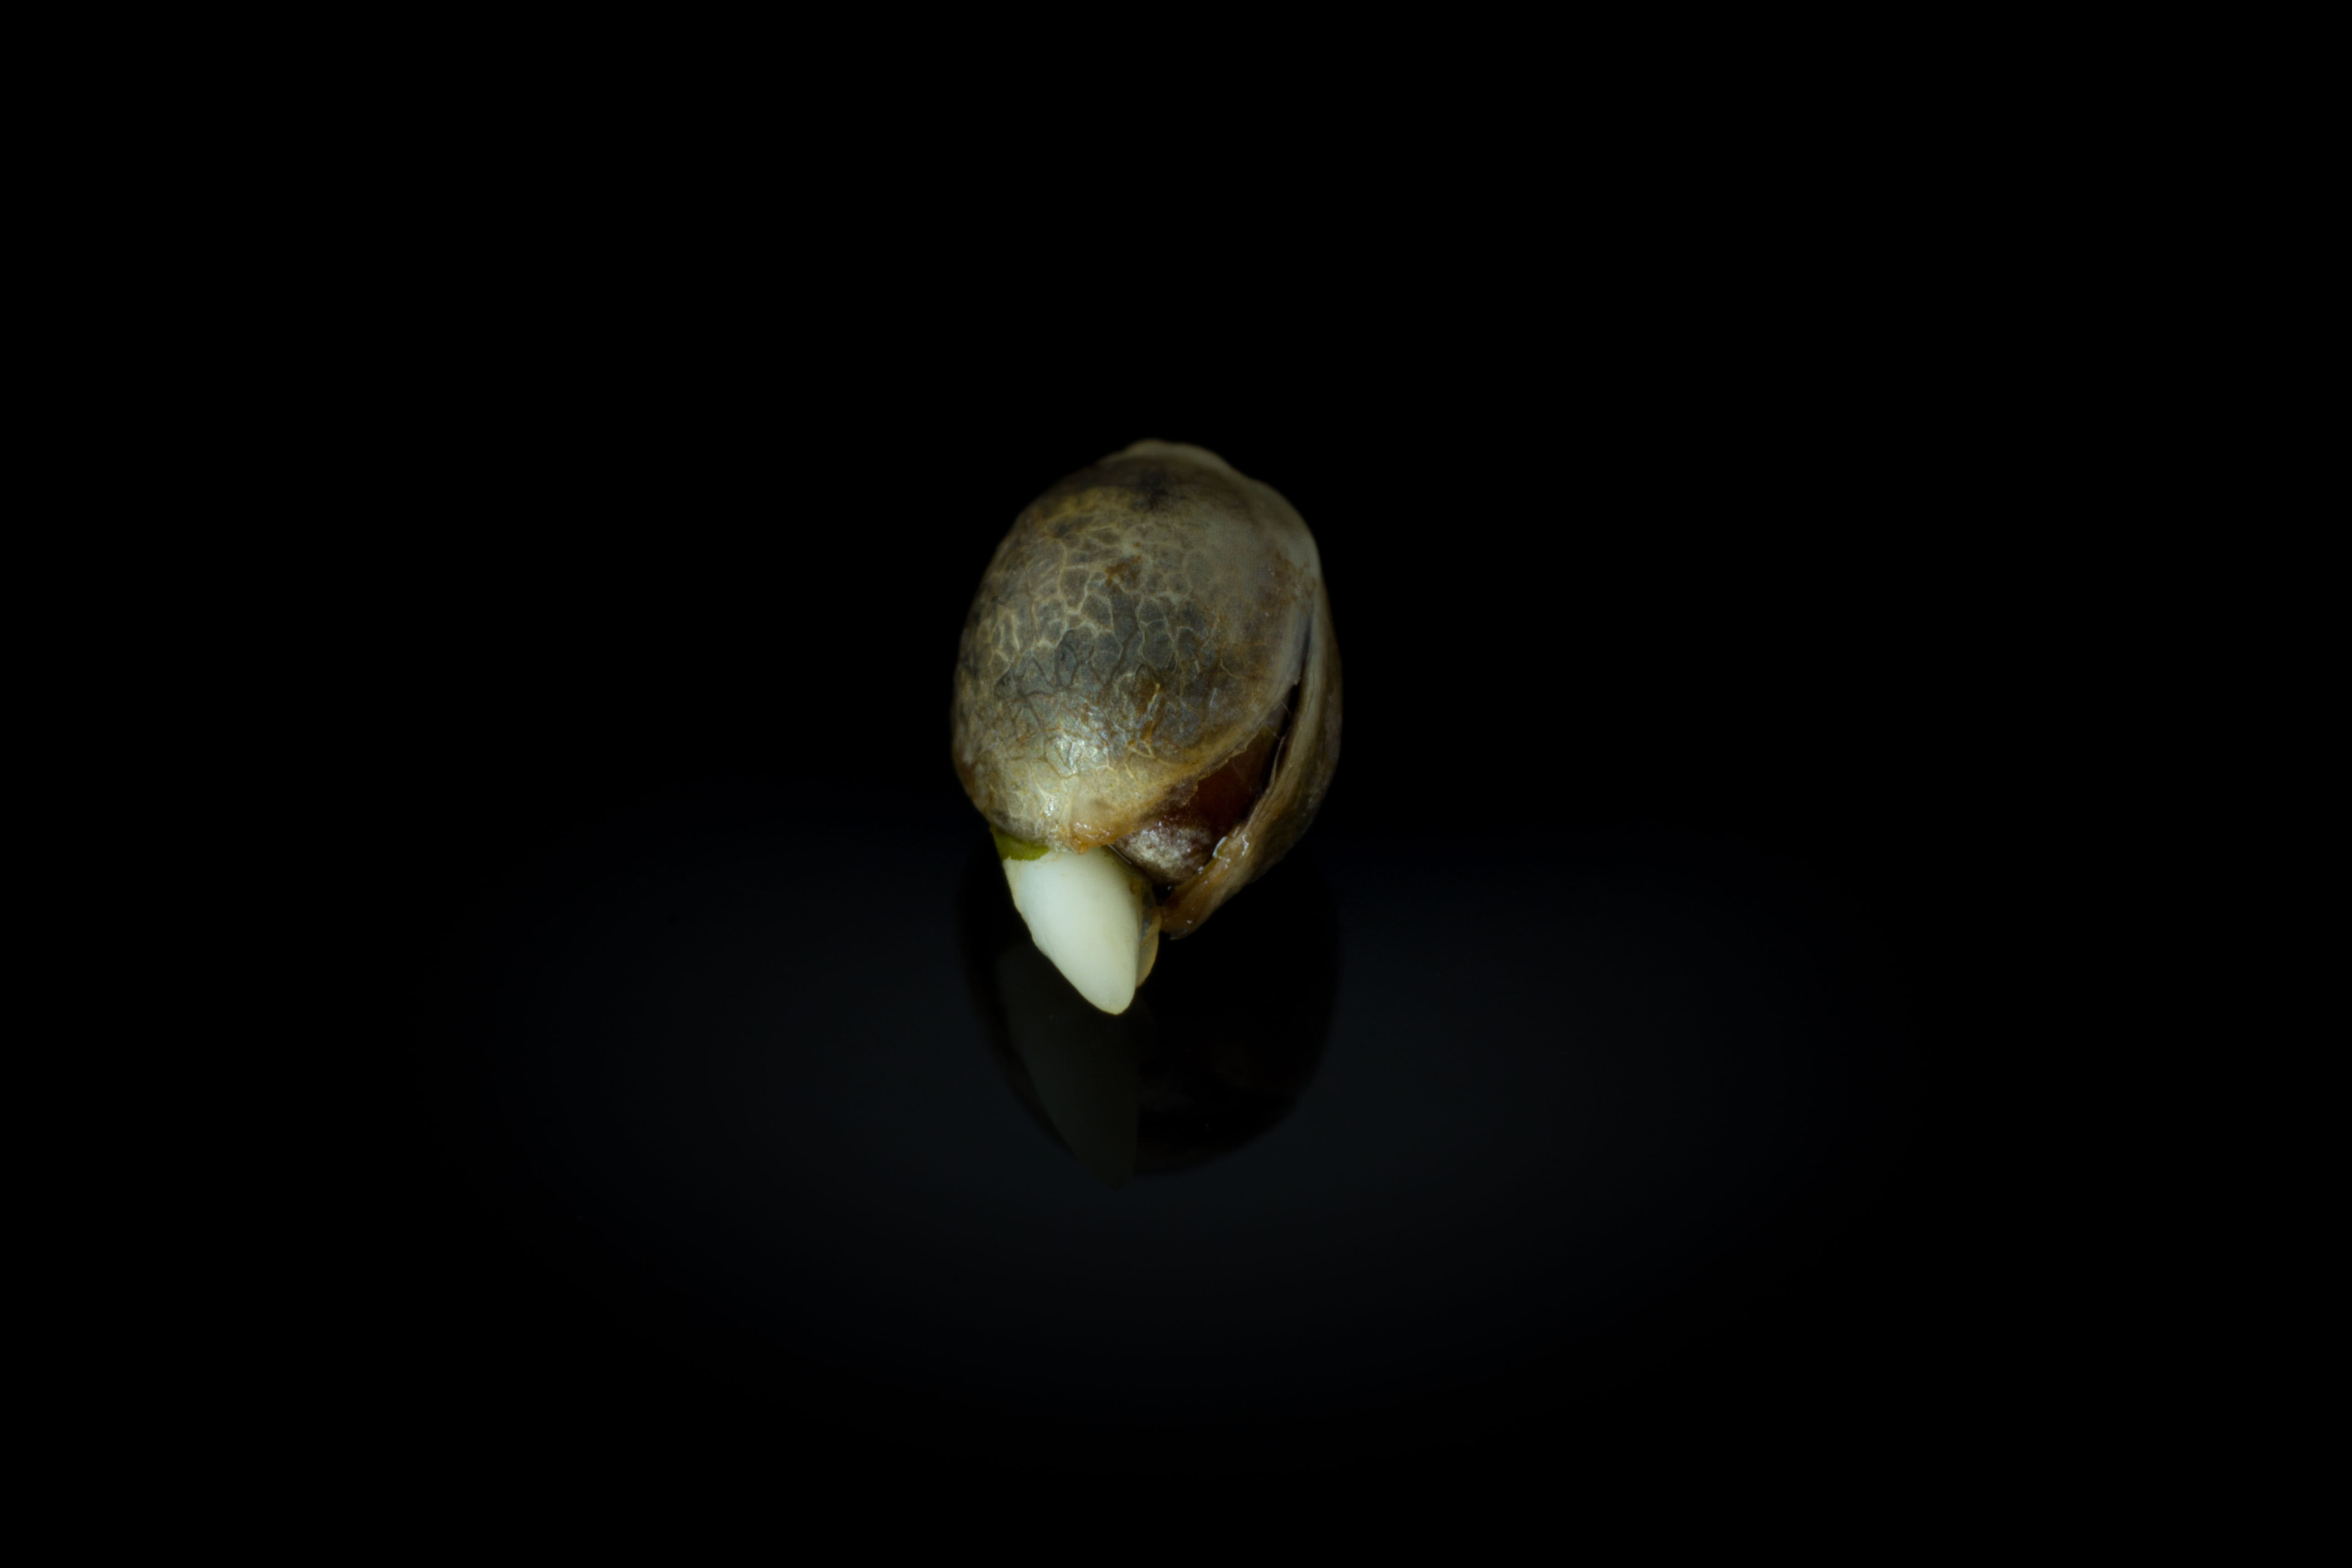
The germination stage begins when cannabis seeds are exposed to moisture and warmth, triggering the emergence of the initial root (radicle) and first leaves (cotyledons). During this critical period, seeds require consistent moisture, temperatures between 70-80°F (21-27°C), and high humidity levels around 70-80%. The growing environment should be kept dark until the seedling emerges from the growing medium. Once the seeds have sprouted, gently place the sprouted seeds into the growing medium to avoid damaging the delicate roots.
Successful germination depends on using viable seeds and providing optimal conditions for root development. Fresh air circulation should be minimal during germination to maintain high humidity levels, but some air movement helps prevent mold and fungal issues. Many experienced growers use humidity domes or covered containers to maintain ideal conditions during this sensitive period.
Common germination problems include seeds that fail to sprout due to age or poor storage conditions, damping-off disease caused by excessive moisture and poor air circulation, and temperature fluctuations that can slow or prevent germination. Using sterile growing mediums and maintaining consistent environmental conditions significantly improves germination success rates.
Further Reading: https://www.seedsman.com/us-en/blog/why-didnt-my-cannabis-seeds-germinate
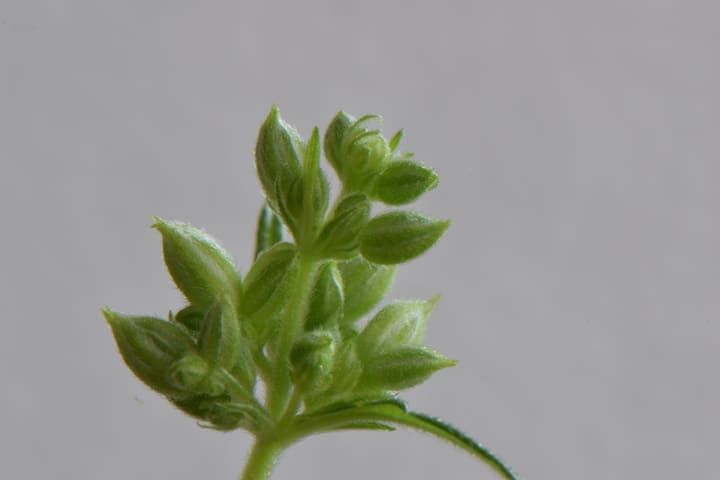
Seedling Stage (Weeks 1-3)
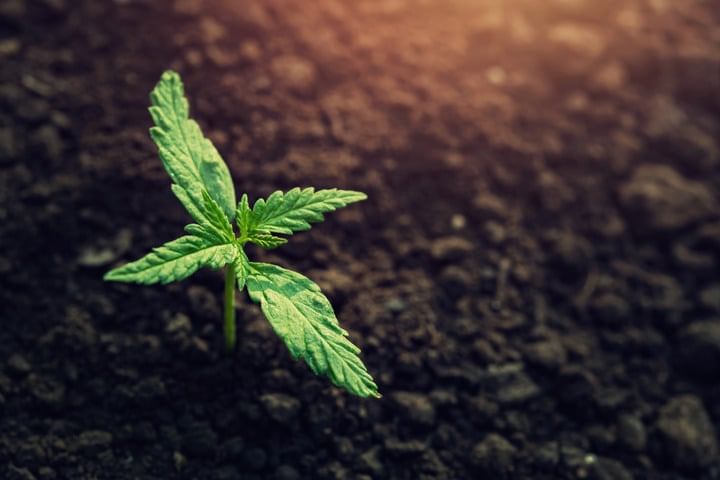
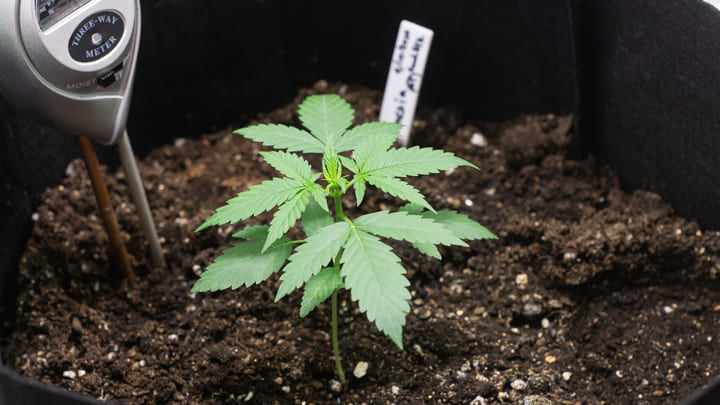
The seedling stage begins when the first true leaves appear and continues until plants develop 4-6 sets of leaves. During this period, young plants are extremely sensitive to environmental stress and require gentle care to establish strong root systems and healthy foliage. Light requirements are relatively low, with 200-400 PPFD being sufficient for healthy seedling development.
Seedling care focuses on maintaining consistent moisture levels without overwatering, which can lead to root rot and stunted growth. To accurately assess when watering is needed and prevent overwatering, use a moisture meter to monitor soil moisture. The growing medium should be kept slightly moist but never waterlogged, and watering should be done gently to avoid disturbing delicate roots. Nutrient requirements are minimal during the seedling stage, as most growing mediums contain sufficient nutrition for early development.
Environmental conditions during the seedling stage should include temperatures between 68-75°F (20-24°C), humidity levels around 65-75%, and gentle air circulation to strengthen stems and prevent fungal issues. LED grow lights are ideal for seedlings due to their low heat output and ability to provide appropriate light intensity without causing light stress.
Common seedling problems include overwatering leading to root rot, nutrient burn from excessive fertilization, light stress from too much light or lights placed too close to plants, and temperature stress from extreme conditions. Monitoring young plants closely and making gradual adjustments helps prevent these issues and promotes healthy growth.
Vegetative Stage (Weeks 3-8)
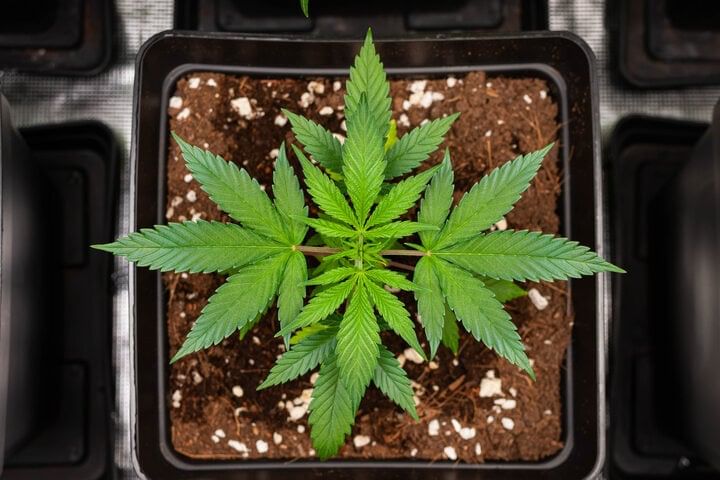
The vegetative stage is characterized by rapid growth and development of leaves, stems, and root systems. During this period, cannabis plants focus their energy on building the structure that will support flower production later in their lifecycle. Lighting requirements increase significantly, with plants benefiting from 400-600 PPFD and 18-24 hours of light per day.
Vegetative growth requires increased nutrition, particularly nitrogen, which supports leaf and stem development. Most growers begin feeding diluted nutrients during the vegetative stage, gradually increasing concentration as plants mature and demonstrate their ability to handle higher nutrient levels. The growing medium should be allowed to dry slightly between waterings to encourage root development and prevent root problems.
Growers train plants during the vegetative stage using techniques such as low-stress training (LST) or topping to shape plant structure and maximize light penetration. Environmental conditions during the vegetative stage should include temperatures between 70-80°F (21-27°C), humidity levels around 55-65%, and strong air circulation to support vigorous growth.
Plant training during the vegetative stage helps create more productive plant architecture and can significantly increase final yields. Techniques such as bending branches, removing lower growth, and creating even canopies help ensure that all bud sites receive adequate light during the flowering stage. Regular monitoring and adjustment of training techniques throughout the vegetative stage produces the best results.
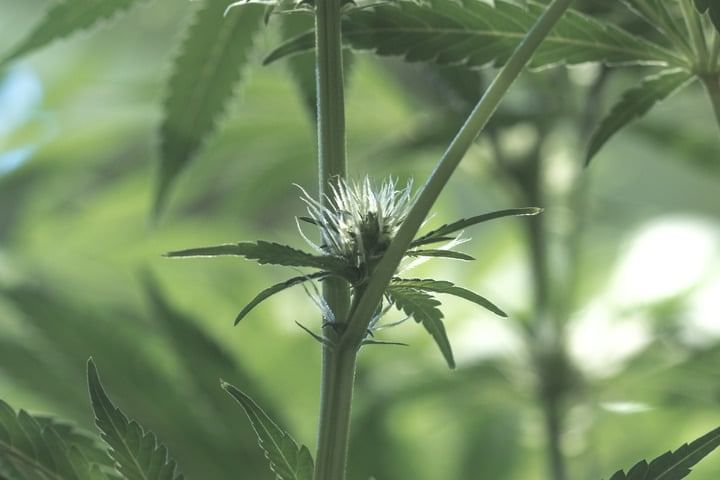
Pre-Flowering Stage (Weeks 8-10)

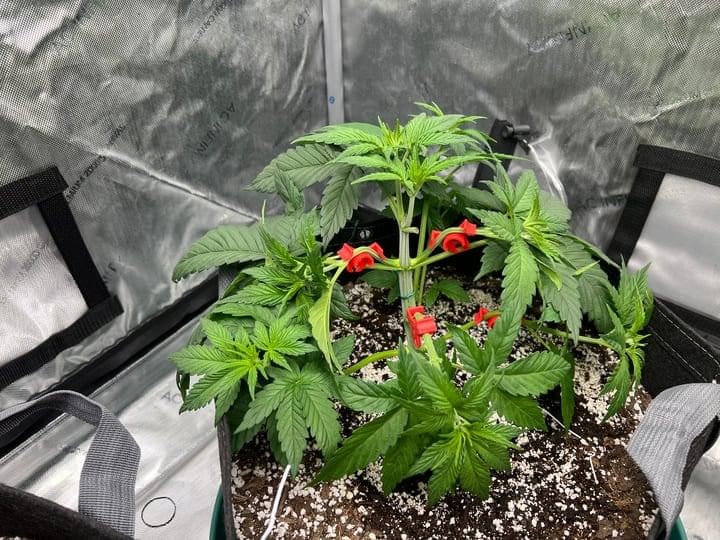
The pre-flowering stage occurs when plants begin showing their sex and preparing for flower production. This transition period is triggered by changes in light cycles for photoperiod plants or occurs automatically for autoflowering varieties. During pre-flowering, plants typically stretch significantly, often doubling in height as they prepare for flower development.
Identifying plant sex during pre-flowering is crucial for maintaining a productive growing environment. Female plants develop small white pistils at branch intersections, while male plants produce small pollen sacs. Removing male plants promptly prevents pollination and ensures that female plants focus their energy on flower production rather than seed development.
Nutritional needs begin shifting during pre-flowering, with plants requiring less nitrogen and more phosphorus and potassium to support flower development. Many growers begin transitioning to flowering nutrients during this stage, gradually reducing nitrogen levels while increasing other nutrients that support bud formation.
Environmental conditions during pre-flowering should include temperatures between 68-78°F (20-26°C), humidity levels around 50-60%, and continued strong air circulation. Light cycles for photoperiod plants are typically changed to 12 hours of light and 12 hours of darkness to trigger flowering, while autoflowering plants continue receiving 18-20 hours of light daily.
Further Reading:Hours Of Light For Autoflowering Cannabis
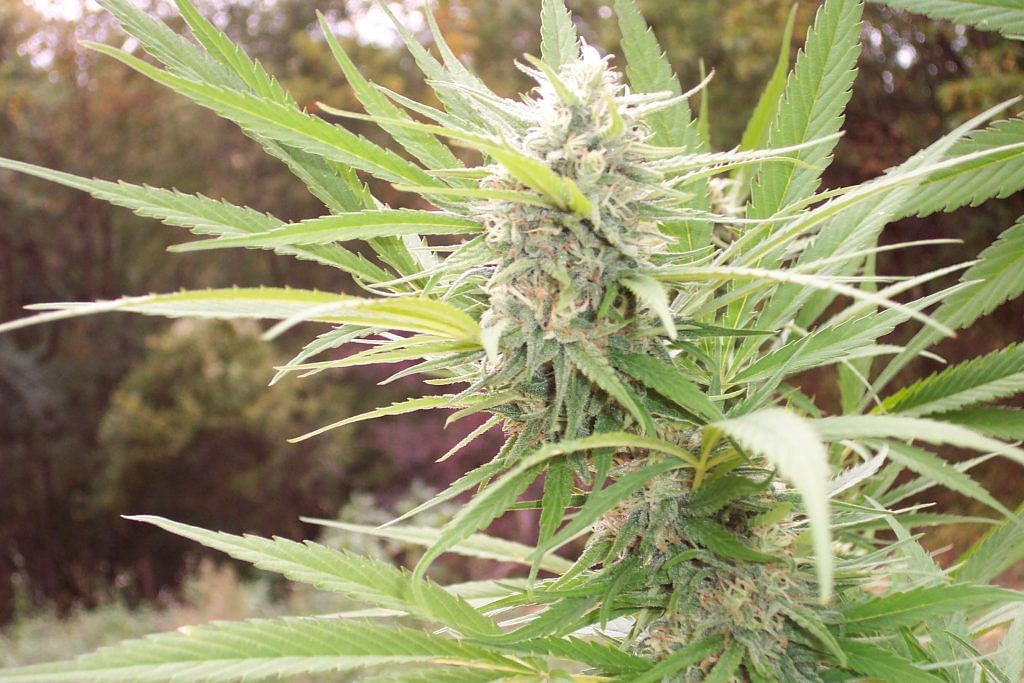
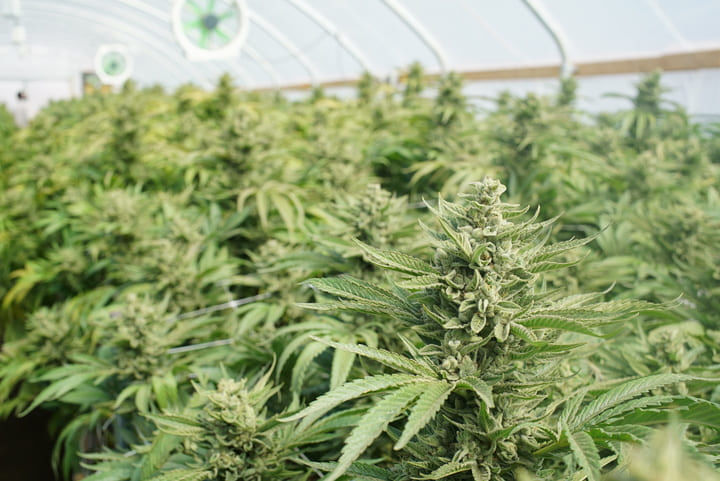
Flowering Stage (Weeks 10-18)
The flowering stage is when cannabis plants produce the resinous buds that are the primary goal of most cultivation efforts. This stage typically lasts 8-12 weeks depending on the strain, with indica varieties generally finishing faster than sativa varieties. During flowering, plants focus their energy on bud development and resin production rather than vegetative growth.
Lighting requirements during flowering emphasize red spectrum light, which promotes flower development and resin production. It is crucial to provide enough light during this stage to ensure optimal bud growth and yield; using a quality grow light can help maintain the necessary intensity and coverage. Light intensity should be maintained at 600-1000 PPFD, with consistent 12-hour light cycles for photoperiod plants. Any light leaks during dark periods can disrupt flowering and cause plants to revert to vegetative growth.
Nutritional needs during flowering emphasize phosphorus and potassium while reducing nitrogen levels. Overfeeding nitrogen during flowering can delay maturation and reduce resin production, while adequate phosphorus and potassium support healthy bud development and trichome production. Many growers use specialized flowering nutrients designed to meet these changing requirements.
Environmental control becomes increasingly important during flowering, with humidity levels gradually reduced from 50% in early flowering to 35-40% in late flowering to prevent mold and mildew issues. Air circulation should be strong enough to move air through the canopy without directly blowing on buds, which can damage delicate trichomes.
Late Flowering and Harvest (Weeks 16-20)
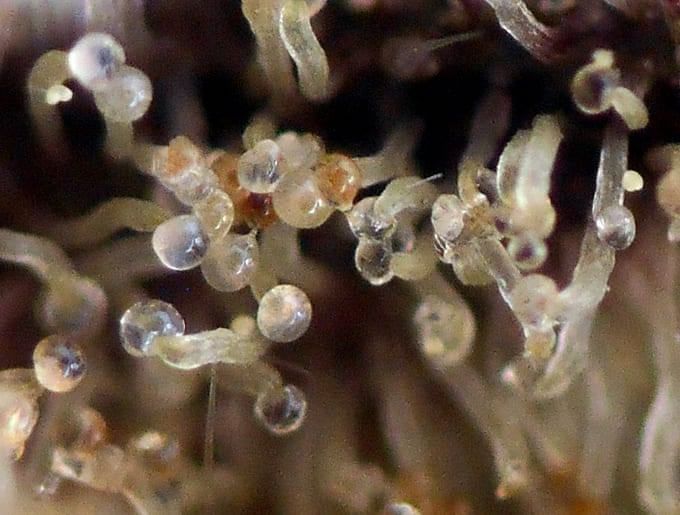
Late flowering is when buds reach their peak potency and are prepared for harvest. During this period, trichomes change from clear to cloudy to amber, indicating the optimal harvest window. Most growers harvest when trichomes are predominantly cloudy with some amber coloration, which provides the best balance of potency and effect.
Further Reading:Using Trichomes To Determine Potency And Harvest Time
Monitoring trichome development requires a jeweler's loupe or digital microscope to observe the tiny resin glands on bud surfaces. Clear trichomes indicate immature buds, cloudy trichomes represent peak THC production, and amber trichomes suggest THC is beginning to degrade into CBN, which produces more sedative effects.
Flushing with plain water during the final 1-2 weeks before harvest helps remove excess nutrients from plant tissues and can improve the taste and smoothness of the final product. However, flushing should be done carefully to avoid stressing plants during this critical period when they are completing bud development.
Harvest timing significantly impacts the quality and effects of the final product. Harvesting too early results in lower potency and yields, while harvesting too late can lead to degraded cannabinoids and harsh-tasting buds. Careful observation of trichome development and plant maturity indicators helps determine the optimal harvest window for each strain.
Identifying Male and Female Cannabis Plants
Understanding how to identify male and female cannabis plants is essential for successful cultivation, as female plants produce the cannabinoid-rich flowers that are the goal of most growing operations. Male plants serve important purposes in breeding programs but are typically removed from growing areas to prevent pollination of female plants, which would result in seeded buds with reduced potency and quality.
Female Plant Identification
Female plants can be identified by the appearance of white, hair-like pistils that emerge from small, tear-drop shaped calyxes at branch intersections and nodes. These pistils typically appear 4-6 weeks into the vegetative stage or when plants are switched to flowering light cycles. Female plants also tend to develop more branches and bushier growth patterns compared to male plants.
The pistils on female plants serve as the reproductive organs that would normally catch pollen from male plants. In the absence of male plants female plants continue developing unfertilised flowers (sinsemilla) that focus their energy on resin and cannabinoid production rather than seed development. This results in the potent, seedless buds that are preferred for consumption.
Female plants typically show their sex earlier than male plants and can sometimes be identified by their growth patterns even before pistils appear. They often develop more nodes and side branches, creating bushier growth that is ideal for training techniques and maximizing bud production. Experienced growers learn to recognize these subtle differences and can often predict plant sex before definitive signs appear.
Male Plant Identification
Male plants develop small, round pollen sacs instead of pistils at branch intersections and nodes. These sacs typically appear slightly earlier than female pistils and are usually clustered in groups. Male plants also tend to grow taller and more spindly than female plants, with fewer side branches and less dense foliage.
The pollen sacs on male plants will eventually open and release pollen into the air, which can travel significant distances and fertilize female plants. Even small amounts of pollen can result in seeded buds, so male plants should be removed as soon as they are identified unless they are being used for breeding purposes.
Further Reading:https://www.seedsman.com/us-en/blog/how-to-tell-if-cannabis-plant-pollinated
Male plants do have value in breeding programs, where they contribute genetic traits to offspring and allow for the development of new strains. However, for most growers focused on producing high-quality buds, male plants represent a waste of space and resources and should be removed promptly to protect female plants from pollination.
Hermaphrodite Plants

Some cannabis plants develop both male and female reproductive organs, a condition known as hermaphroditism. This can occur due to genetic predisposition or environmental stress factors such as light leaks, temperature fluctuations, or nutrient imbalances. Hermaphrodite plants can self-pollinate or pollinate nearby female plants, resulting in seeded buds.
Hermaphrodite plants should be monitored closely and removed if they pose a risk to other plants in the growing area. Some growers attempt to remove male flowers from hermaphrodite plants while preserving female flowers, but this requires constant vigilance and may not be practical in larger growing operations.
Preventing hermaphroditism involves maintaining stable environmental conditions, avoiding stress factors, and selecting genetics from reputable sources that have been tested for stability. Stress-induced hermaphroditism is often preventable through proper environmental control and careful plant management.
Further Reading: Early Signs Of Hermaphrodite Cannabis Plants
Cannabis Plant Training Techniques for Maximum Yields
Plant training techniques are essential tools for maximizing yields and optimizing plant structure in cannabis cultivation. By using these techniques, growers not only achieve better yields but also promote better growth by optimizing light exposure and plant structure. These techniques help create more even canopies, increase light penetration, and encourage the development of multiple main colas rather than single dominant stems. Proper training can significantly increase final yields while making plants easier to manage in limited growing spaces.
Low-Stress Training (LST)
Low-stress training involves gently bending and securing branches to create a more horizontal growth pattern without cutting or damaging plant tissues. This technique encourages lower branches to develop into main colas while maintaining the plant's natural growth processes. LST is ideal for beginners because it carries minimal risk of plant damage while providing significant benefits.
The LST process begins during the vegetative stage when plants have developed 4-6 nodes and stems are flexible enough to bend without breaking. Branches are gently pulled down and secured using soft ties, plant wire, or specialized LST clips. The goal is to create an even canopy where all growing tips receive equal light exposure.
LST should be performed gradually over several weeks, with adjustments made every few days as plants continue growing. Branches that grow above the desired canopy level are gently pulled down and secured, while lower branches are allowed to catch up. This creates a screen-like canopy that maximizes light utilization and bud development.
The benefits of LST include increased yields due to more even light distribution, better air circulation through the canopy, easier plant management and maintenance, and the ability to grow larger plants in limited vertical space. LST can be combined with other training techniques for even greater benefits.
Screen of Green (SCROG)
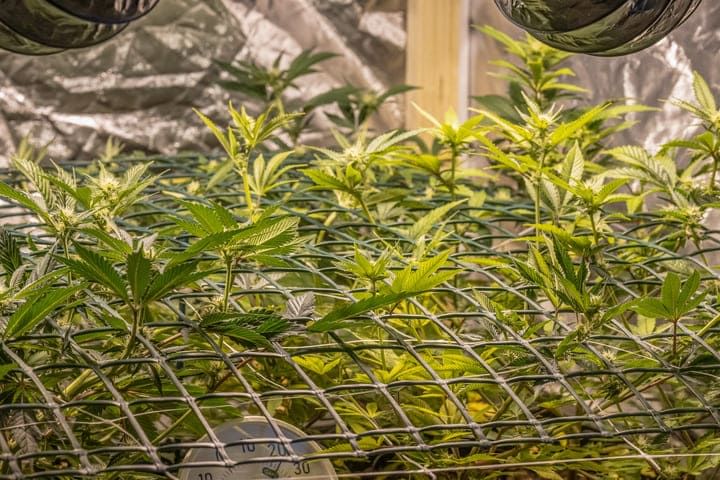
The Screen of Green technique involves installing a horizontal screen or net above plants and training branches to grow through the screen openings. This creates an extremely even canopy and allows growers to control plant height while maximizing the number of bud sites that receive direct light. SCROG is particularly effective for indoor growing where space is limited.
SCROG screens are typically installed 12-18 inches above the growing medium when plants reach 6-8 inches in height. As branches grow through the screen openings, they are trained horizontally beneath the screen until the desired canopy coverage is achieved. Once the screen is 70-80% filled, plants are switched to flowering and allowed to grow vertically through the screen.
The SCROG technique requires careful planning and regular maintenance throughout the vegetative stage. Branches must be trained consistently to prevent some areas from becoming too dense while others remain sparse. Proper SCROG implementation can increase yields by 25-50% compared to untrained plants.
SCROG works best with strains that respond well to training and have moderate stretch during flowering. Indica-dominant strains are often ideal for SCROG due to their bushier growth patterns and shorter internodes. The technique requires more time and effort than other training methods but can produce exceptional results when implemented properly.
Further Reading:The 5 Best Cannabis Strains For A SCROG Setup
Topping and FIMing
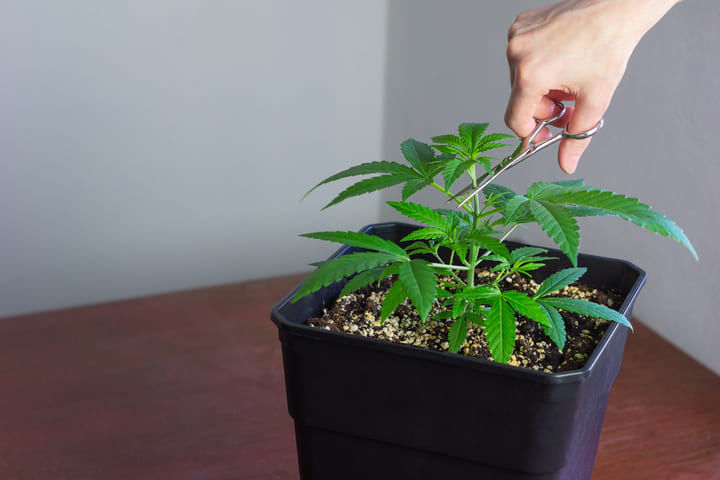
Topping involves cutting the main stem above a node to remove the dominant growing tip, which encourages the development of two main colas instead of one. This technique redistributes growth hormones and creates a bushier plant structure with more potential bud sites. Topping is typically performed during the vegetative stage when plants have developed 4-6 nodes.
The topping process involves making a clean cut with sterilized scissors or razor blade just above the desired node. The plant will respond by developing two new main stems from the node below the cut. These new stems can be topped again to create four main colas, and the process can be repeated to create even more main stems.
FIMing (F*ck I Missed) is a variation of topping that involves pinching or cutting approximately 75% of the new growth tip, leaving some of the growing tip intact. This technique often results in 3-4 new main stems instead of the two produced by traditional topping. FIMing is considered less stressful than topping and may result in faster recovery times.
Both topping and FIMing should be performed during the vegetative stage with at least 2-3 weeks remaining before flowering to allow plants time to recover and develop new growth. These techniques work best on healthy, vigorous plants that can handle the stress of having their main stem removed.
Defoliation Techniques
Defoliation involves selectively removing leaves to improve light penetration and air circulation through the plant canopy. When performed correctly, defoliation can increase yields by ensuring that lower bud sites receive adequate light for proper development. However, excessive defoliation can stress plants and reduce their ability to photosynthesize effectively.
Strategic defoliation focuses on removing large fan leaves that block light from reaching lower bud sites, particularly those growing inward toward the plant's center. Leaves that are yellowing, damaged, or showing signs of disease should also be removed to prevent problems from spreading to healthy plant tissues.
The timing of defoliation is critical for achieving positive results without stressing plants. Light defoliation can be performed throughout the vegetative stage, while more aggressive defoliation is typically done during the transition to flowering and again 2-3 weeks into flowering. Defoliation should be avoided during the final weeks of flowering when plants are focusing energy on bud development.
Proper defoliation technique involves removing entire leaves at their base rather than cutting them partially, which can create entry points for pathogens. Only healthy, sharp tools should be used, and they should be sterilized between plants to prevent disease transmission. Plants should be monitored closely after defoliation to ensure they are recovering properly.
Super Cropping
Super cropping involves deliberately damaging the internal structure of stems without breaking the outer skin, which causes plants to develop stronger, thicker stems and can increase yields. This high-stress training technique should only be attempted by experienced growers who understand plant biology and recovery processes.
The super cropping process involves gently squeezing and bending stems until the internal fibers break but the outer skin remains intact. This creates a controlled injury that the plant responds to by developing stronger support structures and increased nutrient flow to the affected area. The damaged area typically develops a knuckle-like thickening as it heals.
Super cropping should be performed during the vegetative stage on healthy, vigorous plants that can handle the stress of the technique. Plants typically require 1-2 weeks to fully recover from super cropping, during which time they may show temporary signs of stress such as drooping or slowed growth.
The benefits of super cropping include increased stem strength and support for heavy buds, improved nutrient and water transport through thickened stems, and potential yield increases due to improved plant structure. However, the technique carries risks of plant damage or infection if not performed properly, making it unsuitable for inexperienced growers.
Creating the Perfect Growing Environment
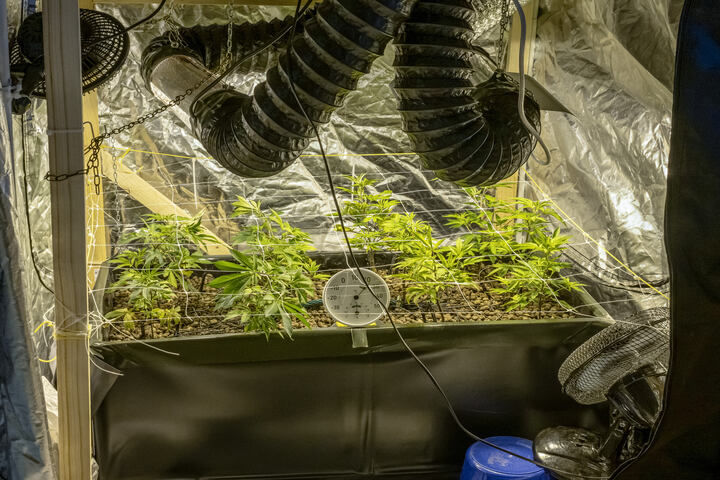
Environmental control is fundamental to successful cannabis cultivation, as plants are highly sensitive to changes in temperature, humidity, air circulation, and lighting conditions. The 'grow space'—the designated area where cannabis plants are cultivated indoors—is critical for managing airflow, lighting, temperature, humidity, and maintaining a light-proof environment to prevent issues like light leaks and herming. Creating and maintaining optimal environmental conditions requires understanding how these factors interact and affect plant health throughout different growth stages. Proper environmental management includes removing stale air and venting hot air to maintain fresh air circulation, control odors, and prevent mold or pest problems. Additionally, avoid bringing outside plants into the grow space to reduce the risk of introducing pests and diseases. Proper environmental management prevents many common problems and allows plants to reach their full genetic potential.
Temperature Management
Cannabis plants thrive within specific temperature ranges that vary depending on their growth stage and the time of day. During the vegetative stage, daytime temperatures should be maintained between 70-80°F (21-27°C), while nighttime temperatures can drop to 65-75°F (18-24°C). During flowering, slightly cooler temperatures of 65-75°F (18-24°C) during the day and 60-70°F (15-21°C) at night help promote resin production and prevent heat stress.
Temperature fluctuations can stress cannabis plants and lead to various problems including stunted growth, reduced yields, slow growth, and increased susceptibility to pests and diseases. Maintaining consistent temperatures requires proper ventilation, heating, and cooling systems that can respond to changing conditions throughout the day and night cycles.
Heat stress is a common problem in indoor growing environments, particularly when using HID lights. HPS and metal halide systems. Symptoms of heat stress include leaf curling, yellowing or browning of leaf tips, leaves that may turn brown, and reduced growth rates. Preventing heat stress requires adequate ventilation, proper light placement, and cooling systems that can maintain optimal temperatures even during peak lighting periods. This is one reason growers prefer LED grow lights.
Cold stress can also impact cannabis plants, particularly during nighttime periods or in outdoor growing situations. Cold temperatures slow plant metabolism and can lead to purple coloration in leaves and stems, reduced nutrient uptake, slow growth, and slowed growth rates. Maintaining minimum temperature thresholds helps prevent cold stress and ensures consistent plant development.
Humidity Control
Humidity management is essential for preventing mold, mildew, and other moisture-related problems while ensuring that plants can transpire effectively and maintain proper water uptake. Optimal humidity levels vary throughout the plant lifecycle, with higher humidity needed during early growth stages and lower humidity required during flowering to prevent bud rot.
During the seedling and early vegetative stages, humidity levels should be maintained between 65-75% to support rapid growth and prevent moisture stress. As plants mature and enter the flowering stage, humidity should be gradually reduced to 45-55% in early flowering and 35-45% in late flowering to prevent mold and mildew issues.
High humidity can lead to various problems including powdery mildew, bud rot, and reduced transpiration rates that can affect nutrient uptake. Low humidity can cause plants to transpire excessively, leading to water stress and nutrient deficiencies. Maintaining optimal humidity levels requires proper ventilation, dehumidification, and monitoring systems.
Humidity control becomes particularly challenging during flowering when dense buds create microclimates within the plant canopy that can trap moisture and create ideal conditions for mold development. Strong air circulation and gradual humidity reduction help prevent these problems while maintaining plant health.
Air Circulation and Ventilation
Proper air circulation is essential for maintaining healthy growing environments and preventing many common problems associated with stagnant air conditions. Fresh air provides carbon dioxide for photosynthesis, removes excess heat and humidity, and helps strengthen plant stems through gentle movement. Inadequate air circulation can lead to hot spots, humidity buildup, and increased risk of pests and diseases.
Ventilation systems should provide complete air exchange in the grow room every 1-3 minutes, depending on the size of the space and the number of plants being grown. Intake fans bring fresh air into the growing area, while exhaust fans remove hot, humid air and odors. The exhaust capacity should typically be larger than the intake capacity to create negative pressure that prevents odors from escaping.
Air circulation within the growing area is provided by oscillating fans that create gentle air movement throughout the plant canopy. Fans should be positioned to move air through the canopy without directly blowing on plants, which can cause wind burn and stress. Multiple smaller fans are often more effective than single large fans for creating even air distribution.
Carbon filters are commonly used in exhaust systems to remove odors and prevent detection of cannabis cultivation. These filters require regular replacement and proper sizing to maintain effectiveness. Proper ventilation design also includes consideration of noise levels, energy efficiency, and the ability to maintain optimal environmental conditions.
Lighting Systems and Requirements
Lighting is one of the most critical factors in cannabis cultivation, as it directly affects plant growth, development, and final yields. Cannabis plants require different light spectrums and intensities throughout their lifecycle, with blue light promoting vegetative growth and red light encouraging flowering and resin production. Modern LED grow lights offer the flexibility to adjust spectrum and intensity to match plant needs.
Light intensity is measured in PPFD (Photosynthetic Photon Flux Density) and should be adjusted based on plant growth stage and strain requirements. Seedlings require 200-400 PPFD, vegetative plants benefit from 400-600 PPFD, and flowering plants can utilize 600-1000+ PPFD when other environmental factors are optimized. Too much light can cause light stress and reduce yields, while insufficient light leads to stretchy growth, poor bud development, and lower yields.
Light cycles control the timing of vegetative growth and flowering in photoperiod cannabis strains. Vegetative growth is maintained with 18-24 hours of light per day, while flowering is triggered by switching to 12 hours of light and 12 hours of uninterrupted darkness. Autoflowering strains do not depend on light cycles and can be grown under 18-20 hours of light throughout their lifecycle.
LED grow lights have become the preferred choice for many growers due to their energy efficiency, low heat output, and ability to provide full spectrum lighting. High-pressure sodium (HPS) and metal halide (MH) lights are still used by some growers, particularly for large-scale operations, but require more cooling and ventilation due to their higher heat output.
The distance between grow lights and plant canopies must be carefully managed to provide optimal light intensity without causing light stress or heat damage. LED lights can typically be placed closer to plants than HID lights due to their lower heat output, but the specific distance depends on the light’s power and the plant’s growth stage. Regular monitoring and adjustment of light height ensures optimal light distribution throughout the growing cycle. Adjusting light placement and intensity is also important to avoid burning young plants or seedlings, protecting delicate foliage and roots from excessive light.
Advanced Hydroponic Growing Systems
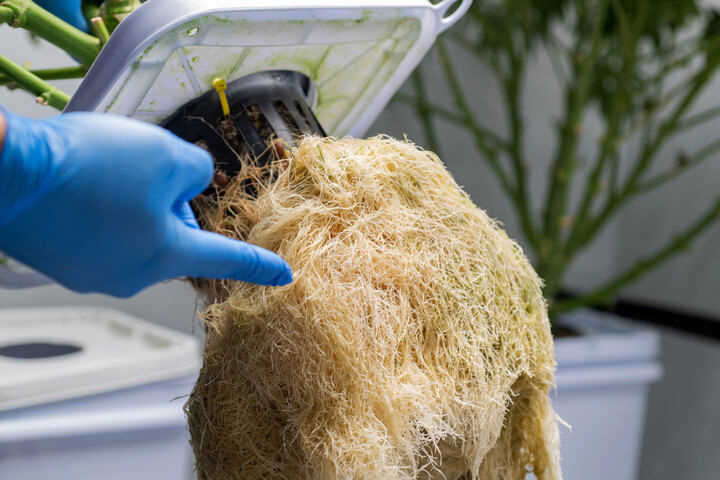
Hydroponic cultivation offers precise control over nutrient delivery and can produce faster growth rates and higher yields compared to traditional soil growing methods. Hydroponic setups allow for even more precise management of nutrients and environmental factors, which can result in healthier plants. Hydroponic systems eliminate many variables associated with soil growing while allowing growers to optimize nutrition and environmental conditions for maximum plant performance. Maintaining a clean hydroponic tank is necessary to prevent root rot and pathogen buildup, both of which can negatively impact plant health. Understanding different hydroponic systems and their requirements is essential for growers looking to maximize their cultivation results.
Further Reading:The Ultimate Hydroponics Grow Guide
Deep Water Culture (DWC) Systems
Deep Water Culture systems suspend plant roots directly in nutrient-rich water that is continuously oxygenated using air pumps and air stones. This direct contact with nutrients allows for rapid nutrient uptake and can produce exceptional growth rates when properly managed. DWC systems are relatively simple to set up and maintain, making them popular among both beginner and experienced hydroponic growers.
The key to successful DWC cultivation is maintaining adequate dissolved oxygen levels in the nutrient solution. Water temperatures should be kept between 65-70°F (18-21°C) to maximize oxygen solubility and prevent root rot. Air pumps should provide sufficient oxygenation to keep the nutrient solution well-aerated, with visible bubbling throughout the reservoir.
DWC systems require regular monitoring of pH levels, which should be maintained between 5.8-6.2 for optimal nutrient uptake. Nutrient concentrations are typically measured using EC (electrical conductivity) meters, with levels adjusted based on plant growth stage and strain requirements. The nutrient solution should be changed completely every 1-2 weeks to prevent nutrient imbalances and maintain optimal growing conditions.
Common DWC problems include root rot caused by high water temperatures or inadequate oxygenation, pH fluctuations that can affect nutrient uptake, and algae growth in reservoirs exposed to light. Preventing these problems requires proper system design, regular maintenance, and careful monitoring of environmental conditions.
Recirculating Deep Water Culture (RDWC)
RDWC systems connect multiple DWC buckets through a network of pipes and pumps that circulate nutrient solution between containers and a central reservoir. This design allows for growing multiple plants while maintaining consistent nutrient levels and pH throughout the system. RDWC systems are ideal for larger growing operations where uniformity and efficiency are important considerations.
The circulation in RDWC systems helps maintain consistent nutrient concentrations and pH levels across all growing containers while providing additional oxygenation through water movement. Central reservoirs make it easier to monitor and adjust nutrient levels for the entire system, reducing the time and effort required for maintenance compared to individual DWC systems.
RDWC systems require careful design to ensure proper water flow and drainage throughout the network. Pumps must be sized appropriately to maintain adequate circulation without creating excessive turbulence that could damage roots. The system should include overflow drains and backup pumps to prevent flooding in case of equipment failure.
The benefits of RDWC systems include improved consistency across multiple plants, easier nutrient management through centralized reservoirs, better oxygenation through water circulation, and the ability to scale up production efficiently. However, these systems are more complex than simple DWC setups and require more initial investment in equipment and infrastructure.
Nutrient Film Technique (NFT)

NFT systems use sloped channels or tubes to create a thin film of nutrient solution that flows continuously past plant roots. This technique provides excellent oxygenation while ensuring constant nutrient availability, making it highly efficient for both water and nutrient usage. NFT systems are commonly used in commercial operations due to their scalability and resource efficiency.
The success of NFT systems depends on maintaining proper flow rates and channel slopes to ensure that nutrient solution reaches all plants while providing adequate oxygenation. Flow rates should be sufficient to keep roots moist without creating standing water that could lead to root rot. Channels should be sloped at 1:30 to 1:40 ratios to maintain proper flow characteristics.
NFT systems require reliable pumps and backup systems to prevent crop loss in case of equipment failure. Even short interruptions in nutrient flow can stress plants and reduce yields, making system reliability critical for success. Backup pumps, alarms, and monitoring systems help ensure continuous operation and early detection of problems.
The advantages of NFT systems include efficient water and nutrient usage, excellent root oxygenation, easy harvesting and plant management, and the ability to grow large numbers of plants in limited space. However, these systems are vulnerable to pump failures and require careful management of flow rates and channel design to prevent problems.
Ebb and Flow (Flood and Drain) Systems
Ebb and flow systems periodically flood growing containers with nutrient solution before draining back to a reservoir, providing plants with nutrients while allowing roots to access oxygen between flooding cycles. This intermittent watering approach combines the benefits of hydroponic nutrition with the root oxygenation advantages of air-filled growing mediums.
The timing and frequency of flood cycles depend on the growing medium, plant size, and environmental conditions. Smaller plants in well-draining mediums may require flooding every 2-4 hours, while larger plants in moisture-retentive mediums may only need flooding 1-2 times per day. Proper timing ensures that plants receive adequate nutrition without becoming waterlogged.
Ebb and flow systems work well with various growing mediums including expanded clay pebbles, perlite, and rockwool. The growing medium should provide good drainage while retaining some moisture between flood cycles. Container design should ensure complete drainage to prevent standing water that could lead to root problems.
The benefits of ebb and flow systems include flexibility in growing medium selection, good root oxygenation between flood cycles, relatively simple system design and maintenance, and tolerance for minor equipment failures. These systems are often recommended for beginners because they are forgiving and easy to understand.
Comprehensive Nutrient Management and Feeding Schedules
Proper nutrition is fundamental to healthy cannabis growth and maximum yield production. Using too much fertilizer can cause nutrient burn, yellowing of leaves, and other issues that negatively impact plant health. Cannabis plants require a complex array of nutrients in specific ratios that change throughout their lifecycle. Understanding nutrient requirements, deficiency symptoms, and feeding schedules—including providing the correct amount of nutrients for each growth stage—allows growers to optimize plant health and avoid common problems that can reduce yields or compromise quality. For certain strains with complex nutritional needs, advanced techniques may be required to ensure precise nutrient management and optimal growth.
Essential Nutrients and Their Functions

Cannabis plants require three primary macronutrients: nitrogen (N), phosphorus (P), and potassium (K), along with secondary nutrients calcium (Ca), magnesium (Mg), and sulfur (S). Micronutrients including iron (Fe), manganese (Mn), zinc (Zn), copper (Cu), boron (B), and molybdenum (Mo) are needed in smaller quantities but are equally important for proper plant function.
Nitrogen is essential for vegetative growth, chlorophyll production, and protein synthesis. During the vegetative stage, cannabis plants require high nitrogen levels to support rapid leaf and stem development. Nitrogen requirements decrease significantly during flowering as plants shift their energy toward bud production rather than vegetative growth.
Phosphorus plays critical roles in energy transfer, root development, and flower formation. Phosphorus requirements increase during flowering as plants develop buds and produce resin. Adequate phosphorus levels are essential for proper bud development and final yield quality, while deficiencies can significantly reduce flower production.
Potassium regulates water uptake, enzyme activation, and overall plant metabolism. Potassium requirements remain relatively high throughout the plant lifecycle and increase during flowering to support bud development and resin production. Potassium deficiencies can reduce yields and compromise plant resistance to stress and disease.
Secondary nutrients and micronutrients support various metabolic processes and enzyme functions that are essential for healthy plant development. Calcium strengthens cell walls and supports root development, magnesium is central to chlorophyll production, and micronutrients serve as cofactors for numerous enzymatic reactions.
Vegetative Stage Nutrition
During the vegetative stage, cannabis plants require high nitrogen levels to support rapid growth and development of leaves, stems, and root systems. Typical N-P-K ratios for vegetative growth range from 3-1-2 to 2-1-1, with nitrogen being the dominant nutrient. EC levels typically range from 1.2-1.6 for most strains, though some varieties may require higher or lower concentrations.
Feeding frequency during the vegetative stage depends on the growing medium and environmental conditions. Hydroponic systems typically require daily feeding or continuous nutrient availability, while soil-grown plants may be fed every 2-3 days or as needed based on growing medium moisture levels. Monitoring plant response and adjusting feeding schedules accordingly helps optimize nutrition without overfeeding.
Common vegetative stage deficiencies include nitrogen deficiency causing yellowing of lower leaves, magnesium deficiency creating interveinal chlorosis, and calcium deficiency leading to brown spots on leaves. These deficiencies can be prevented through proper nutrient formulation and regular monitoring of plant health and nutrient solution parameters.
Nutrient burn during the vegetative stage typically manifests as brown or yellow leaf tips and edges, indicating that nutrient concentrations are too high for the plant's current needs. Reducing nutrient concentrations and flushing with plain water can help resolve nutrient burn issues and prevent further damage to plant tissues.
Flowering Stage Nutrition
Flowering stage nutrition emphasizes phosphorus and potassium while reducing nitrogen levels to support bud development and resin production. Typical N-P-K ratios for flowering range from 1-3-2 to 1-2-3, with some growers using even lower nitrogen ratios in late flowering. EC levels may increase to 1.6-2.2 during peak flowering, depending on strain tolerance and environmental conditions.
The transition from vegetative to flowering nutrition should be gradual to avoid shocking plants with sudden nutrient changes. Many growers begin reducing nitrogen levels during the pre-flowering stretch while gradually increasing phosphorus and potassium concentrations. This transition typically occurs over 1-2 weeks to allow plants to adjust to their changing nutritional needs.
Calcium and magnesium requirements often increase during flowering as plants develop dense buds that require strong cellular structure. Many growers supplement with cal-mag products during flowering to prevent deficiencies that can compromise bud quality and yield. Proper calcium levels also help prevent bud rot and other structural problems.
Late flowering nutrition may include further reductions in nitrogen and overall nutrient concentrations as plants approach harvest. Some growers implement flushing protocols during the final 1-2 weeks, feeding only plain water to remove excess nutrients from plant tissues. However, flushing should be done carefully to avoid stressing plants during this critical period.
Nutrient Deficiency Identification and Treatment

Recognizing nutrient deficiencies early allows growers to correct problems before they significantly impact plant health and yields. Discolored leaves are a key indicator of nutrient deficiencies. Different deficiencies create characteristic symptoms that can help identify the specific nutrient that is lacking. Understanding these symptoms and their progression helps growers respond quickly and effectively to nutritional problems. Careful observation of plant leaves can help diagnose a range of nutrient problems.
Nitrogen deficiency typically begins with yellowing of lower, older leaves that progresses upward through the plant if not corrected. The yellowing usually starts at leaf tips and edges before spreading to entire leaves. Leaves may turn yellow as a primary symptom. Severe nitrogen deficiency can cause significant leaf drop and stunted growth, particularly during the vegetative stage when nitrogen requirements are highest.
Phosphorus deficiency often manifests as dark green or purple coloration in leaves, particularly on leaf stems and undersides. Leaves may also develop brown or bronze spots and become thick or leathery in texture. Phosphorus deficiency is most problematic during flowering when plants require high phosphorus levels for bud development.
Potassium deficiency creates yellowing and browning of leaf edges that can progress to entire leaves if not corrected. Affected leaves may also curl or become crispy in texture. Potassium deficiency can significantly impact bud development and plant resistance to stress and disease, making early identification and treatment important.
Calcium deficiency appears as brown or rust-colored spots on leaves, often accompanied by leaf curling or distortion. Calcium deficiency can also cause weak stems and increased susceptibility to bud rot and other structural problems. Magnesium deficiency creates interveinal chlorosis, where leaf veins remain green while the tissue between veins turns yellow.
Micronutrient deficiencies are less common but can create various symptoms including interveinal chlorosis (iron deficiency), brown spots on leaves (manganese deficiency), or distorted growth patterns (zinc deficiency). These deficiencies are often related to pH problems that prevent nutrient uptake rather than actual nutrient shortages in the growing medium.
pH Management and Nutrient Uptake
pH levels directly affect nutrient availability and uptake, making proper pH management essential for healthy plant development. Cannabis plants can absorb nutrients most efficiently when pH levels are maintained within specific ranges that vary depending on the growing medium. Soil-grown plants prefer pH levels between 6.0-7.0, while hydroponic systems require pH levels between 5.8-6.2.
pH fluctuations can lock out specific nutrients even when they are present in adequate concentrations in the growing medium. For example, iron becomes unavailable at high pH levels, while phosphorus availability decreases in acidic conditions. Maintaining stable pH levels within the optimal range ensures that all nutrients remain available for plant uptake.
Regular pH monitoring using digital pH meters or test strips helps growers maintain optimal conditions and identify problems before they affect plant health. pH should be checked daily in hydroponic systems and every few days in soil systems, with adjustments made as needed using pH up or pH down solutions.
pH adjustment should be done gradually to avoid shocking plants with sudden changes. Large pH swings can stress plants and disrupt nutrient uptake even if the final pH is within the optimal range. Making small adjustments over time and allowing the system to stabilize helps maintain consistent growing conditions.
Buffer solutions and pH stabilizers can help maintain consistent pH levels in hydroponic systems, reducing the frequency of manual adjustments required. However, these products should be used carefully and according to manufacturer instructions to avoid creating nutrient imbalances or other problems.
Pest and Disease Management
Effective pest and disease management is crucial for maintaining healthy cannabis plants and protecting yields from damage caused by insects, mites, fungi, and other pathogens. Prevention is always preferable to treatment, as established infestations can be difficult to eliminate and may require harsh treatments that can affect plant health and final product quality. Implementing preventive measures, such as regular inspections and maintaining a clean grow space, is essential to proactively protect plants from pests and diseases. Understanding common pests and diseases and implementing integrated pest management strategies helps maintain healthy growing environments.
Common Cannabis Pests
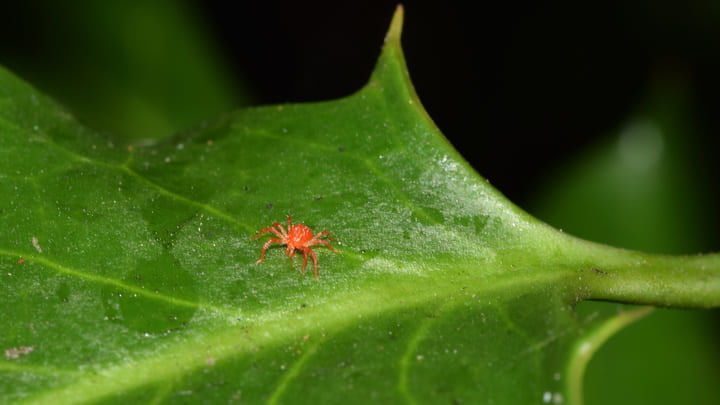
Spider mites are among the most common and destructive pests affecting cannabis plants, particularly in indoor growing environments with low humidity and poor air circulation. These tiny arachnids feed on plant sap and can quickly multiply to damaging levels if not controlled early. Spider mites create fine webbing on leaves and cause stippling damage that appears as tiny yellow or white spots on leaf surfaces. Damage to cannabis leaves, such as holes or discoloration, is a common sign of pest infestation.
Spider mite prevention involves maintaining adequate humidity levels (above 50%), ensuring good air circulation, and regularly inspecting plants for early signs of infestation. Treatment options include predatory mites, insecticidal soaps, neem oil, and miticides, though chemical treatments should be avoided during flowering to prevent contamination of buds.
Aphids are small, soft-bodied insects that feed on plant sap and can transmit viral diseases between plants. They typically cluster on new growth and leaf undersides, causing leaves to curl and become distorted. Aphids also produce honeydew, a sticky substance that can promote the growth of sooty mold and attract other pests.
Thrips are tiny insects that feed by scraping leaf surfaces and sucking plant juices, creating silvery streaks and black spots on leaves. Heavy thrip infestations can significantly reduce plant vigor and yields while also transmitting viral diseases. Thrips are particularly problematic because they can develop resistance to many common insecticides.
Fungus gnats are small flies whose larvae feed on organic matter and roots in growing mediums. While adult gnats are primarily a nuisance, their larvae can damage root systems and create entry points for root rot and other diseases. Fungus gnats are most common in overwatered growing mediums with high organic content.
Whiteflies are small, white flying insects that feed on plant sap and can quickly multiply to damaging levels. They are particularly problematic in greenhouse environments and can be difficult to control once established. Whiteflies also transmit viral diseases and produce honeydew that can lead to secondary problems.
Disease Prevention and Treatment
Powdery mildew is a fungal disease that appears as white, powdery spots on leaf surfaces and can quickly spread throughout a growing area if not controlled. This disease thrives in conditions with high humidity, poor air circulation, and moderate temperatures. Powdery mildew can significantly reduce plant vigor and yields while also affecting the quality of harvested buds.
Prevention of powdery mildew involves maintaining proper environmental conditions including adequate air circulation, moderate humidity levels (below 60% during flowering), and avoiding overcrowding of plants. Treatment options include sulfur-based fungicides, potassium bicarbonate solutions, and biological controls, though prevention is always preferable to treatment.
Bud rot (Botrytis cinerea) is a serious fungal disease that affects developing buds and can destroy significant portions of the harvest if not detected early. This disease typically begins inside dense buds where air circulation is poor and humidity levels are high. Infected buds develop brown, mushy areas that can quickly spread to healthy tissue.
Preventing bud rot requires maintaining low humidity levels during flowering (below 50%), ensuring adequate air circulation through the canopy, and avoiding damage to buds that can create entry points for the fungus. Infected buds should be removed immediately and disposed of away from the growing area to prevent spread to healthy plants.
Root rot is caused by various fungal and bacterial pathogens that attack root systems in waterlogged or poorly oxygenated growing mediums. Poor drainage in the growing medium increases the risk of root rot by creating conditions that favor these pathogens. Symptoms include yellowing leaves, stunted growth, and brown, mushy roots with a foul odor. Root rot can quickly kill plants if not addressed promptly and is often difficult to treat once established.
Prevention of root rot involves maintaining proper drainage in growing mediums, avoiding overwatering, ensuring adequate oxygenation in hydroponic systems, and maintaining appropriate water temperatures. Treatment options are limited once root rot is established, making prevention the most effective strategy.
Damping-off is a fungal disease that affects seedlings and young plants, causing them to collapse at the soil line. This disease is most common in overwatered, poorly ventilated conditions with high humidity. Poor drainage in the growing medium can also increase the risk of damping-off. Preventing damping-off involves using sterile growing mediums, avoiding overwatering, and maintaining good air circulation around seedlings.
Integrated Pest Management Strategies
Integrated Pest Management (IPM) combines multiple control strategies to prevent and manage pest and disease problems while minimizing the use of chemical treatments. IPM emphasizes prevention, monitoring, and the use of biological controls before resorting to chemical interventions. This approach is particularly important for cannabis cultivation where product quality and safety are paramount concerns. New growers should pay special attention to integrated pest management to avoid common mistakes and set a strong foundation for successful cultivation.
Prevention strategies form the foundation of effective IPM programs and include maintaining clean growing environments, quarantining new plants and equipment, using sterile growing mediums, and implementing proper sanitation practices. Regular cleaning and disinfection of growing areas, tools, and equipment helps prevent the introduction and spread of pests and diseases.
Monitoring involves regular inspection of plants for early signs of pest and disease problems, allowing for prompt intervention before problems become severe. Visual inspections should be conducted at least weekly, with particular attention paid to leaf undersides, growing tips, and areas with poor air circulation where problems often begin.
Biological controls use beneficial insects, mites, and microorganisms to control pest populations naturally. Predatory mites can effectively control spider mites, while beneficial bacteria and fungi can help prevent root diseases. Biological controls are often more sustainable than chemical treatments and can be used throughout the growing cycle without concerns about residue contamination.
Cultural controls involve modifying growing practices and environmental conditions to make conditions less favorable for pests and diseases while promoting plant health. This includes maintaining optimal temperature and humidity levels, ensuring adequate air circulation, avoiding overcrowding, and implementing proper watering practices.
Chemical controls should be used as a last resort when other methods are insufficient to control pest or disease problems. When chemical treatments are necessary, they should be selected based on their effectiveness against the target pest, their safety profile, and their potential impact on beneficial organisms and final product quality. Chemical treatments should be avoided during flowering whenever possible to prevent contamination of harvested buds.
Frequently Asked Questions About Cannabis Plant Care
How many times should a cannabis plant be topped?
Cannabis plants can be topped multiple times during the vegetative stage to create bushier growth and more main colas. Most growers top their plants 1-3 times, with each topping creating two new main stems from the cut point. The first topping is typically done when plants have 4-6 nodes, and subsequent toppings can be performed every 1-2 weeks as long as plants have sufficient time to recover before flowering. More aggressive topping (4+ times) is possible but requires longer vegetative periods and may stress some strains. The key is allowing adequate recovery time between toppings and ensuring plants have at least 2-3 weeks of vegetative growth remaining after the final topping.
Do cannabis plants like to be touched?
Cannabis plants should be handled minimally to avoid stress and potential damage to delicate tissues. While occasional gentle handling for training, pruning, or inspection is necessary, excessive touching can stress plants and potentially damage trichomes on flowering plants. When handling is necessary, it should be done with clean hands or gloves to prevent contamination and disease transmission. Young plants and seedlings are particularly sensitive to handling and should only be touched when absolutely necessary. During flowering, handling should be minimized to protect developing trichomes and prevent damage to delicate bud structures.
What triggers most cannabis plants to flower?
Most cannabis plants (photoperiod strains) are triggered to flower by changes in light cycles, specifically when they receive 12 hours of uninterrupted darkness per day. This mimics the natural seasonal changes that occur in fall when daylight hours decrease. The dark period must be completely uninterrupted, as even small amounts of light during the dark cycle can prevent flowering or cause plants to revert to vegetative growth. Autoflowering strains flower automatically based on age (typically 3-4 weeks) regardless of light cycles. Environmental factors like temperature and stress can also influence flowering timing, but photoperiod is the primary trigger for most cannabis varieties.
Do cannabis plants need direct sunlight?
Cannabis plants can thrive in both direct sunlight and artificial lighting, but they do require intense light for optimal growth and bud production. Outdoor plants benefit from direct sunlight, which provides the full spectrum and intensity needed for maximum yields. However, plants can also be grown successfully under artificial lighting systems such as LED grow lights, high-pressure sodium, or metal halide lights. The key is providing adequate light intensity (measured in PPFD) rather than specifically requiring direct sunlight. Indoor growing with artificial lights offers more control over environmental conditions and can produce results equal to or better than outdoor cultivation in many cases.
What's the best method to grow cannabis indoors?
The best indoor growing method depends on experience level, budget, and goals, but soil growing in containers is often recommended for beginners due to its forgiving nature and lower initial investment. Experienced growers may prefer hydroponic systems like Deep Water Culture (DWC) or RDWC for faster growth and higher yields. Key factors for successful indoor growing include proper lighting (LED grow lights are most efficient), environmental control (temperature 70-80°F, humidity 40-60%), adequate ventilation and air circulation, and appropriate growing medium. The grow room should provide complete environmental control with proper ventilation, carbon filtration for odor control, and sufficient space for plant development.
How do I get fresh air in my grow room?
Fresh air circulation in a grow room requires both intake and exhaust systems working together to provide complete air exchange. Install intake fans or passive vents to bring fresh air into the space, and exhaust fans to remove hot, humid air and odors. The exhaust capacity should typically be larger than intake to create negative pressure that prevents odors from escaping. Complete air exchange should occur every 1-3 minutes depending on room size and plant count. Oscillating fans inside the grow room provide air circulation around plants, strengthening stems and preventing stagnant air conditions that can lead to mold and pest problems.
What are the best conditions for a grow room?
Optimal grow room conditions include temperature between 70-80°F (21-27°C) during lights-on and 65-75°F (18-24°C) during lights-off, humidity levels of 40-60% (lower during flowering), strong air circulation with complete air exchange every 1-3 minutes, and appropriate lighting for the growth stage. The grow room should be light-tight during dark periods, have adequate electrical capacity for lighting and ventilation systems, and include environmental monitoring equipment. Carbon filters help control odors, while proper insulation helps maintain stable temperatures. The space should be easily accessible for plant maintenance and large enough to accommodate full plant development.
Can you have too much light in a grow room?
Yes, cannabis plants can receive too much light, which causes light stress and can actually reduce yields and plant health. Symptoms of too much light include leaf bleaching (white or yellow coloration), leaf curling, brown or burnt leaf tips, and stunted growth. The optimal light intensity varies by growth stage, with seedlings requiring 200-400 PPFD, vegetative plants needing 400-600 PPFD, and flowering plants utilizing 600-1000+ PPFD. Light stress is more likely when other environmental factors (temperature, humidity, CO2) are not optimized. Proper light distance and intensity management, combined with environmental control, prevents light stress while maximizing photosynthesis and growth.
What to spray on cannabis to prevent bud rot?
Prevention is more effective than treatment for bud rot, focusing on environmental control rather than spraying products on buds. Maintain humidity below 50% during flowering, ensure strong air circulation through the canopy, and avoid overcrowding plants. If preventive spraying is necessary during vegetative growth, options include potassium bicarbonate solutions, neem oil, or biological fungicides containing beneficial bacteria. However, avoid spraying anything on buds during flowering as this can affect quality and safety. Remove any infected buds immediately and improve environmental conditions to prevent spread. Proper environmental control is the most effective bud rot prevention strategy.
When should I stop giving my cannabis plant nutrients?
Many growers stop feeding nutrients 1-2 weeks before harvest, feeding only plain water during this "flush" period. However, recent scientific research suggests that flushing may not significantly improve bud quality and can potentially reduce yields if done too aggressively. A more moderate approach involves gradually reducing nutrient concentrations during the final weeks rather than completely eliminating them. Monitor plant health and trichome development to determine the optimal harvest timing. If flushing, watch for signs of severe nutrient deficiencies that could stress plants during this critical period. The goal is maintaining plant health while allowing natural senescence processes to occur.
What does calmag deficiency look like?
Calcium deficiency appears as brown or rust-colored spots on leaves, often starting with newer growth and progressing to older leaves. Leaves may also show curling, crinkling, or distorted growth patterns. Severe calcium deficiency can cause weak stems and increased susceptibility to bud rot. Magnesium deficiency creates interveinal chlorosis, where leaf veins remain green while the tissue between veins turns yellow, typically starting with older, lower leaves. Both deficiencies are common in hydroponic systems and when using soft water or RO water. Cal-mag supplements can prevent these deficiencies, but proper pH management is essential for nutrient uptake.
Should I spray the leaves of my cannabis plant?
Foliar spraying can be beneficial during vegetative growth for delivering nutrients quickly or treating pest and disease problems, but should be avoided during flowering to prevent mold issues and product contamination. When foliar feeding during vegetative growth, spray during lights-off periods to prevent leaf burn, use diluted nutrient solutions (1/4 to 1/2 strength), and ensure good air circulation to help leaves dry quickly. Avoid spraying if humidity is already high or air circulation is poor. Never spray buds during flowering as this can promote mold growth and affect final product quality. Focus on root feeding during flowering and use foliar applications only when necessary during vegetative growth.
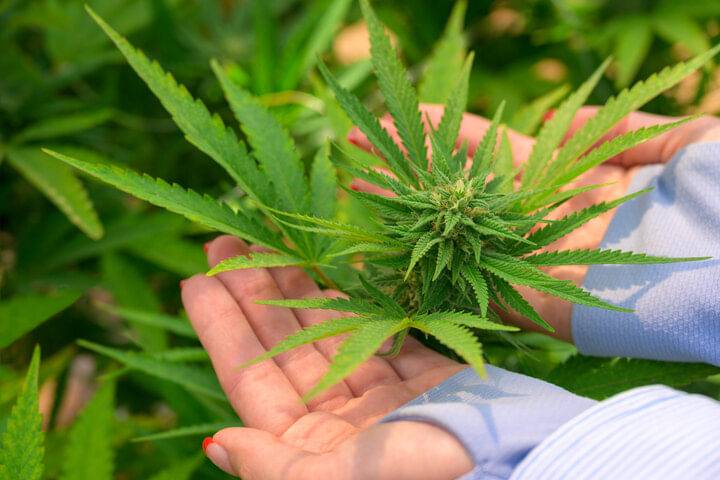
Harvest, Drying, and Curing
Proper harvest timing, drying, and curing techniques are essential for maximizing the quality, potency, and shelf life of cannabis buds. These post-harvest processes can significantly impact the final product's taste, aroma, smoothness, and effects. Understanding when and how to harvest, along with proper post-harvest handling, ensures that months of careful cultivation result in the highest quality final product.
Determining Harvest Timing
![]()
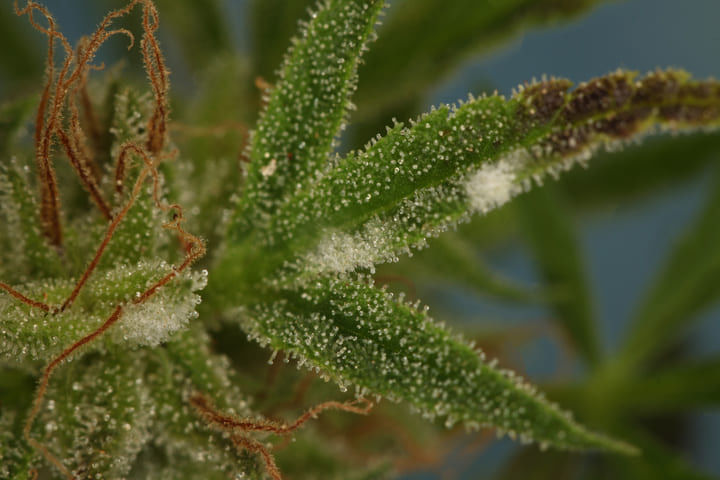
Harvest timing significantly impacts the potency, effects, and quality of cannabis buds. The optimal harvest window is determined primarily by observing trichome development using a jeweler's loupe or digital microscope. Trichomes progress from clear to cloudy to amber, with each stage representing different cannabinoid profiles and effects.
Clear trichomes indicate that buds are not yet mature and THC production is still increasing. Harvesting at this stage results in lower potency and less developed flavors and aromas. Cloudy or milky trichomes represent peak THC production and are generally considered the optimal harvest point for maximum potency and balanced effects.
Amber trichomes indicate that THC is beginning to degrade into CBN, which produces more sedative effects. Some growers prefer a mix of cloudy and amber trichomes (typically 70% cloudy, 30% amber) for a more relaxing effect profile. The ratio of cloudy to amber trichomes can be adjusted based on desired effects and personal preferences.
Other harvest indicators include pistil color changes (from white to brown/orange), overall plant appearance and leaf yellowing, and the swelling of calyxes. However, trichome observation remains the most reliable method for determining optimal harvest timing, as other indicators can be influenced by environmental factors and strain genetics.
Proper Harvesting Techniques
Harvesting should be done during the dark period or early morning when terpene levels are highest and plants are fully hydrated. Use harvesting tools such as clean, sharp scissors or pruning shears to make clean cuts that minimize damage to plant tissues. Harvest entire plants or individual branches depending on plant size and drying space availability.
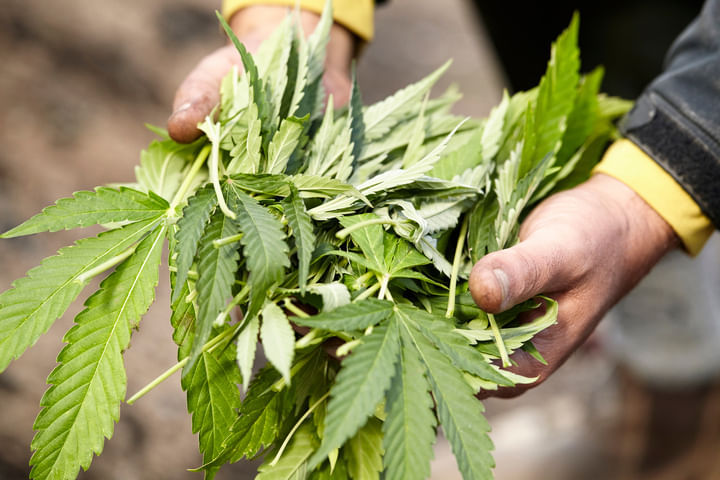
When harvesting whole plants, cut the main stem at the base and hang the entire plant upside down in the drying area. For branch harvesting, cut individual branches at their base and hang them separately. Remove large fan leaves during harvest but leave smaller sugar leaves that contain trichomes, as these can be trimmed later during the manicuring process.
Handle harvested plants gently to avoid damaging trichomes, which are fragile and can be easily knocked off during rough handling. Work in cool, low-light conditions when possible to preserve terpenes and prevent trichome degradation. Clean tools between plants to prevent cross-contamination and disease transmission.
Timing the harvest properly also involves considering environmental conditions and plant health. Avoid harvesting during periods of high humidity or immediately after watering, as excess moisture can complicate the drying process and increase the risk of mold development during drying and curing.
Drying Process
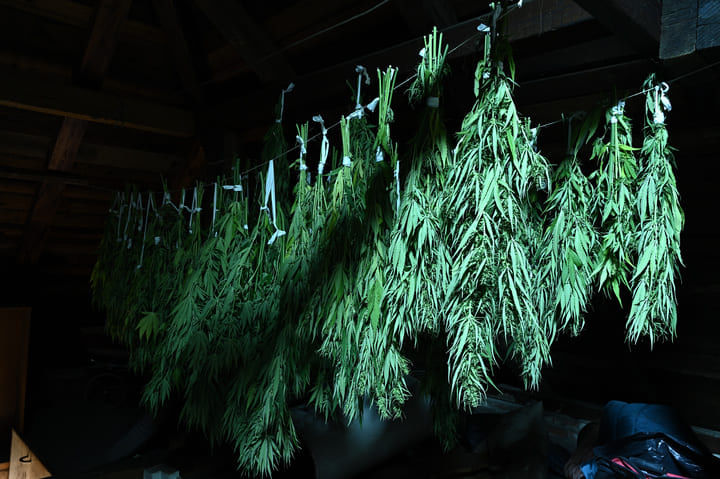
Proper drying removes moisture from harvested buds while preserving cannabinoids, terpenes, and overall quality. The drying environment should maintain temperatures between 60-70°F (15-21°C) and humidity levels between 45-55%. Air circulation should be gentle but consistent, avoiding direct airflow on hanging buds that could cause uneven drying.
The drying area should be dark to prevent light degradation of cannabinoids and terpenes. Hang plants or branches with adequate spacing to allow air circulation around all surfaces. Avoid overcrowding the drying area, as this can create microclimates with higher humidity that promote mold development.
Drying typically takes 7-14 days depending on environmental conditions, bud density, and plant size. Buds are ready for the next stage when small stems snap rather than bend, and the outer portions of buds feel dry to the touch while the inner portions retain some moisture. Over-drying can degrade quality and make buds harsh, while under-drying can lead to mold problems during curing.
Monitor the drying process daily and adjust environmental conditions as needed to maintain optimal drying rates. Use fans for air circulation but avoid pointing them directly at hanging buds. Dehumidifiers or humidifiers may be necessary to maintain optimal humidity levels depending on ambient conditions.
Curing for Quality and Potency
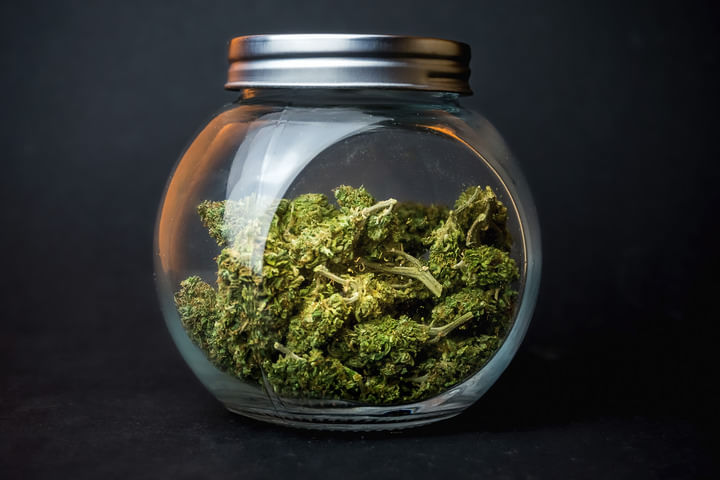
Curing is a controlled aging process that improves the taste, aroma, smoothness, and overall quality of dried cannabis buds. During curing, remaining moisture redistributes throughout the buds while beneficial chemical processes continue to develop flavors and aromas. Proper curing can significantly improve the quality of the final product.
The curing process begins by placing dried buds in airtight containers such as glass jars, filling them approximately 75% full to allow for air circulation. Store containers in a cool, dark place with stable temperatures around 60-70°F (15-21°C). Open containers daily for the first week to release excess moisture and exchange air, a process known as "burping."
During the first week of curing, containers should be opened once or twice daily for 5-10 minutes to allow moisture to escape and fresh air to enter. If buds feel too moist or stick together, leave containers open longer or remove buds to dry further before returning them to containers. If buds feel too dry, reduce burping frequency or add a humidity control pack.
After the first week, burping frequency can be reduced to every few days, then weekly as the curing process progresses. Properly cured buds will continue to improve for several weeks to months when stored in optimal conditions. The curing process is complete when buds have a pleasant aroma, smooth smoke, and optimal moisture content for consumption and storage.
Further Reading:Curing In Jars vs Curing Cannabis in Bags
Legal Considerations and Compliance
Cannabis cultivation laws vary significantly by location, and growers must understand and comply with all applicable local, state, and federal regulations. Legal considerations include licensing requirements, plant limits, security measures, and quality testing standards. Staying informed about changing regulations and maintaining compliance is essential for legal cannabis cultivation operations.
Understanding Local Regulations
Cannabis cultivation laws differ dramatically between jurisdictions, with some areas allowing personal cultivation while others prohibit it entirely. Research local laws thoroughly before beginning any cultivation project, including plant limits, growing area restrictions, security requirements, and licensing procedures. Many jurisdictions distinguish between medical and recreational cultivation with different rules for each.
Plant limits are commonly used to regulate personal cultivation, with typical limits ranging from 3-12 plants per person or household. Some areas also impose restrictions on flowering plants versus total plants, canopy size, or total yield amounts. Understanding these limits and staying within legal boundaries is crucial for avoiding legal problems.
Zoning restrictions may limit where cannabis can be cultivated, with many areas prohibiting cultivation in residential zones or requiring specific distances from schools, parks, or other sensitive areas. Some jurisdictions require cultivation to occur in enclosed, locked facilities that are not visible from public areas.
Registration and licensing requirements vary by location, with some areas requiring simple registration while others mandate complex licensing processes with fees, background checks, and facility inspections. Maintain all required documentation and ensure compliance with reporting requirements where applicable.
Security and Safety Requirements
Many jurisdictions require specific security measures for cannabis cultivation, including locked facilities, surveillance systems, and restricted access controls. Security requirements often include physical barriers such as fences or walls, electronic monitoring systems, and alarm systems that alert authorities to unauthorized access attempts.
Surveillance systems may be required to monitor all areas where cannabis is cultivated, processed, or stored. These systems often must meet specific technical requirements for camera resolution, recording duration, and data storage. Some jurisdictions require real-time monitoring or remote access capabilities for law enforcement agencies.
Access control measures typically require limiting facility access to authorized individuals only, maintaining visitor logs, and ensuring that all cannabis products are secured when facilities are unoccupied. Employee background checks and training may also be required for commercial operations.
Fire safety and electrical safety are important considerations for indoor cultivation facilities, which often use high-wattage lighting systems and electrical equipment. Proper electrical installation, fire suppression systems, and emergency procedures help ensure safe operations and may be required by local building codes and cannabis regulations.
Conclusion
Successful cannabis cultivation requires understanding and managing multiple interconnected factors including genetics, environment, nutrition, pest management, and post-harvest processing. This comprehensive cannabis plant care guide provides the foundation for growing healthy cannabis plants and producing high-quality buds, whether for personal use or commercial operations.
The key to successful cannabis cultivation lies in creating optimal growing conditions while maintaining consistency throughout the plant lifecycle. Environmental control, proper nutrition, and preventive pest management form the foundation of healthy plant development. Understanding plant biology and growth stages allows growers to provide appropriate care and avoid common problems that can reduce yields or compromise quality.
Modern cannabis cultivation benefits from advances in lighting technology, growing systems, and nutrient formulations that make it easier than ever to achieve professional results. However, success still depends on attention to detail, consistent care, and understanding the fundamental needs of cannabis plants throughout their development.
Whether growing in soil or hydroponic systems, indoors or outdoors, the principles of providing optimal environmental conditions, balanced nutrition, and proper plant care remain constant. By following the guidelines and techniques outlined in this cannabis plant care guide, growers can maximize their chances of success and produce high-quality cannabis that meets their goals and expectations.
Remember that cannabis cultivation is both an art and a science, requiring patience, observation, and continuous learning. Each grow cycle provides opportunities to refine techniques and improve results. Stay informed about new developments in cultivation technology and techniques while maintaining focus on the fundamental principles that ensure healthy plant development and maximum yields.
About the Author
Jorge Cervantes is a world-renowned cannabis cultivation expert with over 40 years of experience in indoor, outdoor, and greenhouse growing. He is the author of "The Cannabis Encyclopedia," which sold more than 850,000 copies worldwide and is considered the definitive guide to cannabis cultivation. Jorge has received numerous awards for his contributions to cannabis education, including the Benjamin Franklin Gold Award for excellence in publishing and the Lester Grinspoon Lifetime Achievement Award from High Times Magazine.
Jorge's expertise spans all aspects of cannabis cultivation, from basic plant care to advanced growing techniques and commercial production methods. He has traveled extensively to study cannabis cultivation practices around the world and has worked with growers in over 40 countries. His practical, science-based approach to cannabis education has helped millions of growers achieve better results and avoid common cultivation mistakes.
Connect with Jorge Cervantes on LinkedIn for the latest updates on cannabis cultivation techniques and industry developments. His commitment to education and sharing knowledge continues to advance the art and science of cannabis cultivation worldwide.
